Getting Started
Before you start
A complete project as output of this tutorial can be downloaded here.Installation
Add dependencies to your build.gradle:
dependencies {
    compile 'com.robocreative.android:robo-common:1.0'
    compile 'com.robocreative.android:robo-messaging:1.0'
    compile 'com.robocreative.android:robo-mvp:1.0'
}
If you want to use stuffs in support v4 library, add following dependency:
dependencies {
    compile 'com.robocreative.android:robo-mvp-support-v4:1.0'
}
If you want to use stuffs in appcompat v7 library, add following dependency:
dependencies {
    compile 'com.robocreative.android:robo-mvp-support-v7:1.0'
}
Declaring View
Let's create a screen that warmly prints a welcome message. Define a view interface as following:
package com.example.myapplication;

import com.robo.mvp.View;

public interface WelcomeView extends View {
    /**
     * Shows a message. The message content is decided by Presenter.
     */
    void showMessage(String message);
}
Creating Presenter
Create a presenter that inherits AbstractPresenter and accepts WelcomeView as generic parameter:
package com.example.myapplication;

import com.robo.mvp.AbstractPresenter;
import com.robo.mvp.View;

public class WelcomePresenter extends AbstractPresenter<WelcomeView> {

    @Override
    protected void onViewSet(final WelcomeView view) {
        view.getListeners().set(View.OnReadyListener.class, new View.OnReadyListener() {
            @Override
            public void onReady() {
                view.showMessage("Welcome to Robo MVP's world!");
            }
        });
    }
}
By default, your presenter must implement a method named onViewSet. It's called when your view has been bound to your presenter at runtime. That moment you can register view's event listeners.
The OnReadyListener is default event listener of every view. The method onReady is called when a view signals itself being ready to use (See View's Life cycle). When the view ready, you can ask it to print your message.
View events are briefly described in the section View Features.
Presenter Life Cycle
Before implementing View, please take a short break and read this section to be explained life cycle of Presenter.
In Robo MVP, Presenter is automatically resolved when View is created at runtime. Thus you don't need to call Presenter's constructor on your own. Presenter is automatically destroyed when the View is about to be destroyed also.
The diagram below shows the moments Presenter is populated and destroyed, corresponding to life cycle of Activity and Fragment and explains the flow inside Presenter Binding/Removal in details:
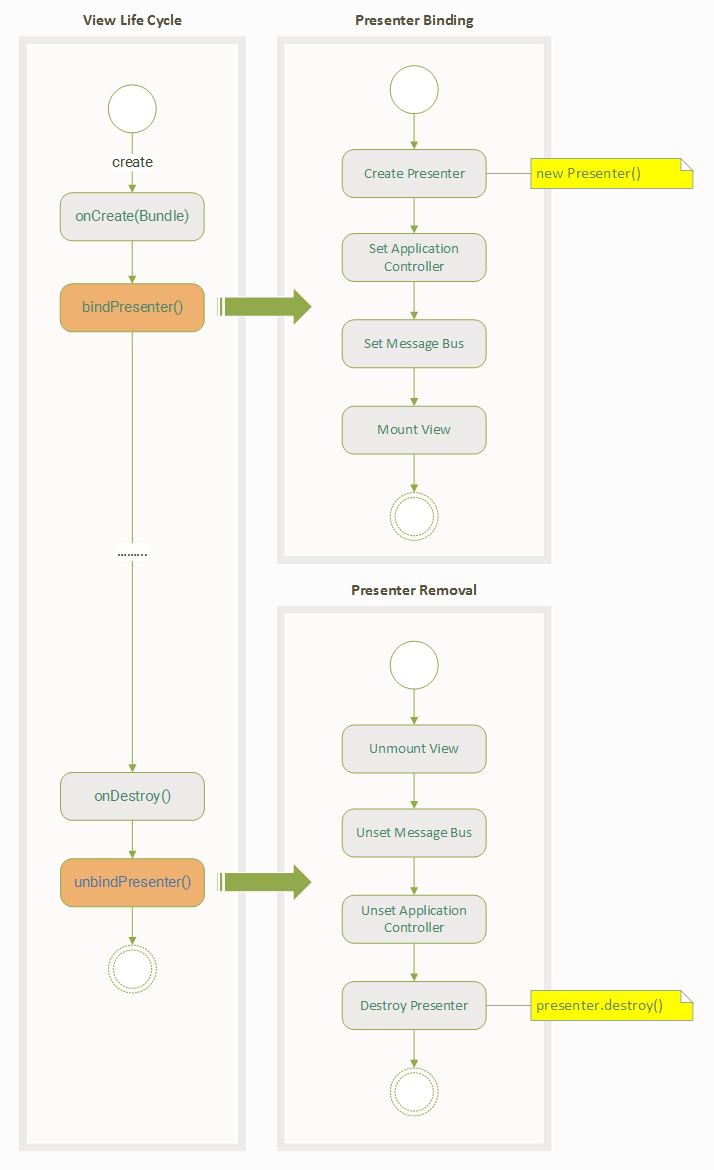
As in the diagram:
- Presenter collaborators including Application Controller, Message Bus and View are automatically set upon Presenter initialization, and
- These Presenter collaborators are automatically unset upon Presenter removal.
Besides, Presenter interface also declares a method named destroy(). This method is called at the very last step in Presenter removal flow, allows you to release other resources allocated for Presenter.
If you allocated some resources as part of your Presenter, e.g IO Stream, remember to free all of them either by overriding method destroy() from AbstractPresenter, or before the moment this function is called.
Implementing View
Create a concrete view as an implementation of MyView. In this sample we will use an activity. Layout looks like:
<?xml version="1.0" encoding="utf-8"?>
<LinearLayout xmlns:android="http://schemas.android.com/apk/res/android"
    android:orientation="vertical" android:layout_width="match_parent"
    android:layout_height="match_parent">

    <TextView
        android:layout_width="wrap_content"
        android:layout_height="wrap_content"
        android:id="@+id/txt_message" />
</LinearLayout>
Java code for the activity:
package com.example.myapplication;

import android.os.Bundle;
import android.widget.TextView;

import com.robo.mvp.AbstractActivity;

public class WelcomeActivity extends AbstractActivity implements WelcomeView {

    private TextView txtMessage;

    @Override
    protected void onInitLayout(Bundle savedInstanceState) {
        setContentView(R.layout.activity_welcome);
        txtMessage = (TextView)findViewById(R.id.txt_message);
    }

    @Override
    public void showMessage(String message) {
        txtMessage.setText(message);
    }
}
You may noticed that the activity overrides a method onInitLayout(Bundle). This method is used to initialize layout for activity as an alternative to onCreate(Bundle). It is actually called inside onCreate(Bundle). As a special design of Robo MVP, please use onInitLayout(Bundle) to set layout to activity instead of onCreate(Bundle).
Use annotation @BindTo on top of this activity to specify its target presenter. This view will be automatically bound to the specified presenter at runtime.
@BindTo(WelcomePresenter.class)
public class WelcomeActivity extends AbstractActivity implements WelcomeView {
    // class body...
}
Theoretically, you can use @BindTo on top of your view interface, not concrete view (the activity in this case). Robo MVP can still resolve presenter for your view without any problem. Nevertheless, this is not a good practice as it limits reusability of your view, i.e two concrete views having same interface cannot be bound to two different presenters. So, we recommend to always place @BindTo on top of your concrete view, not the view interface.
Starting Bootstrapper
Robo MVP needs to be started at application starts up. Create an application class and place following statements to start Robo MVP:
package com.example.myapplication;

import android.app.Application;

import com.robo.mvp.Bootstrapper;

public class MyApplication extends Application {
    @Override
    public void onCreate() {
        super.onCreate();
        new Bootstrapper().start();
    }
}
Remember to assign your application name in AndroidManifest.xml also.
Launching Your Application
Run your first application. In a few moments, the screen should open with the welcome message. Great job!