Variants
Overview
Robo MVP out-the-box supports both variants: Passive View and Supervising Controller. If you have never heard of those variants, Martin Fowler's articles about Passive View and Supervising Controller are some good starts for you.
Depending on your favourite and your development context, you can either go with a variant, or mix both of them them together in your project.
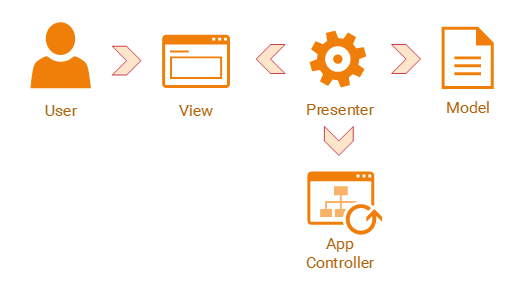
Passive View
This variant centralizes application logic and UI logic in Presenter. Thus enables unit testing for both kinds of logic. If you prefer testing all UI logic before making concrete views, Passive View is your choice.
Imagine you have a sign-up form allowing user to register account.
package com.example.myapplication;

import com.robo.mvp.View;

public interface SignUpView extends View {

    String getFullName();

    String getUsername();

    String getPassword();

    void focusOnFullName();

    void focusOnUserName();

    void focusOnPassword();

    void showError(String message);

    /**
     * Listens to SignUp event on the view.
     */
    interface OnSignUpListener {
        void onSignUp();
    }
}
The presenter is resposible for validating user input, controlling view and interacting with data sources.
package com.example.myapplication;
import com.robo.mvp.AbstractPresenter;
public class SignUpPresenter extends AbstractPresenter<SignUpView> {
@Override
protected void onViewSet(final SignUpView view) {
view.getListeners().set(SignUpView.OnSignUpListener.class, new SignUpView.OnSignUpListener() {
@Override
public void onSignUp() {
registerUser(view.getFullName().trim(), view.getUsername().trim(), view.getPassword().trim());
}
});
}
private void registerUser(String fullName, String username, String password) {
if (fullName.isEmpty()) {
mView.focusOnFullName();
mView.showError("Full name is required");
} else if (username.isEmpty()) {
mView.focusOnUserName();
mView.showError("Username is required");
} else if (password.length() < 6) {
mView.focusOnPassword();
mView.showError("Password must have at least six characters");
} else {
// everything is OK. Saves user information and navigates user to another screen.
}
}
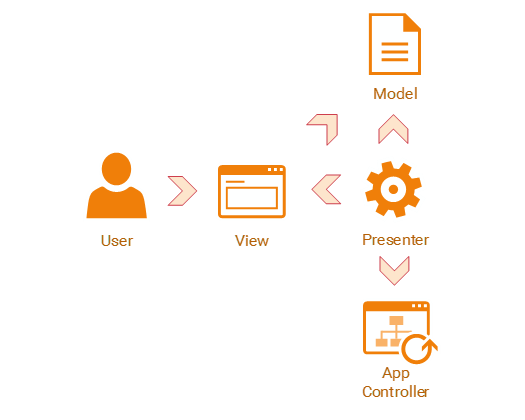
}Supervising Controller
This variant allows View to perform some data binding and View can also handle some simple UI logic as well. If you want to skip testing simple UI logic and you want to have a lightweight Presenter, you can go with Supervising Controller.
Starting with a model called Account. This model will be used for data displaying purpose.
package com.example.myapplication;

public class Account {

    private String mFullName;
    private boolean mGenre;
    private String mAddress;

    public String getFullName() {
        return mFullName;
    }

    public void setFullName(String fullName) {
        mFullName = fullName;
    }

    public boolean getGenre() {
        return mGenre;
    }

    public void setGenre(boolean genre) {
        mGenre = genre;
    }

    public String getAddress() {
        return mAddress;
    }

    public void setAddress(String address) {
        mAddress = address;
    }
}
Define a AccountView that displays Account. You may notice that the view accepts Account as generic parameter.
package com.example.myapplication;

import com.robo.mvp.ContextProvider;
import com.robo.mvp.LoaderManagerProvider;
import com.robo.mvp.View;

public interface AccountView extends View<Account>, ContextProvider, LoaderManagerProvider {

}
Do not mind the LoaderManagerProvider and ContextProvider in the view. They are just for working with data source layer underneath.
Now create a presenter for the view. In presenter, we just use LoaderManager to load account information (the model) then give the model to the view.
package com.example.myapplication;

import android.app.LoaderManager;
import android.content.AsyncTaskLoader;
import android.content.Context;
import android.content.Loader;
import android.os.Bundle;

import com.robo.mvp.AbstractPresenter;
import com.robo.mvp.View;

public class AccountPresenter extends AbstractPresenter<AccountView> {
    @Override
    protected void onViewSet(final AccountView view) {
        view.getListeners().set(View.OnReadyListener.class, new View.OnReadyListener() {
            @Override
            public void onReady() {
                view.getLoaderManager().initLoader(0, Bundle.EMPTY, new AccountLoaderCallback()).forceLoad();
            }
        });
    }

    public class AccountLoaderCallback implements LoaderManager.LoaderCallbacks<Account> {

        @Override
        public Loader<Account> onCreateLoader(int id, Bundle args) {
            return new AccountLoader(mView.getContext());
        }

        @Override
        public void onLoadFinished(Loader<Account> loader, Account data) {
            // binds the model to the view and lets the view displays the model in its own way.
            mView.setModel(data);
        }

        @Override
        public void onLoaderReset(Loader<Account> loader) {

        }
    }

    public static class AccountLoader extends AsyncTaskLoader<Account> {

        public AccountLoader(Context context) {
            super(context);
        }

        @Override
        public Account loadInBackground() {
            // here loads account from data source.
        }
    }
}
Below is an implementation of the AccountView. We use onModelSet(Account) to bind account information on the view.
package com.example.myapplication;

import android.widget.CheckBox;
import android.widget.EditText;

import com.robo.mvp.AbstractFragment;
import com.robo.mvp.BindTo;

@BindTo(AccountPresenter.class)
public class AccountFragment extends AbstractFragment<Account> implements AccountView {

    private EditText edtFullName;
    private CheckBox chkGenre;
    private EditText edtAddress;

    @Override
    protected void onModelSet(Account account) {
        edtFullName.setText(account.getFullName());
        chkGenre.setChecked(account.getGenre());
        edtAddress.setText(account.getAddress());
    }
}
Robo MVP also plays very well with Google Data Binding library. If you are using the library, you can place Google Binding statements within the method onModelSet above. We will supplement detailed example of using the library in Supervising Controller later.